 Save
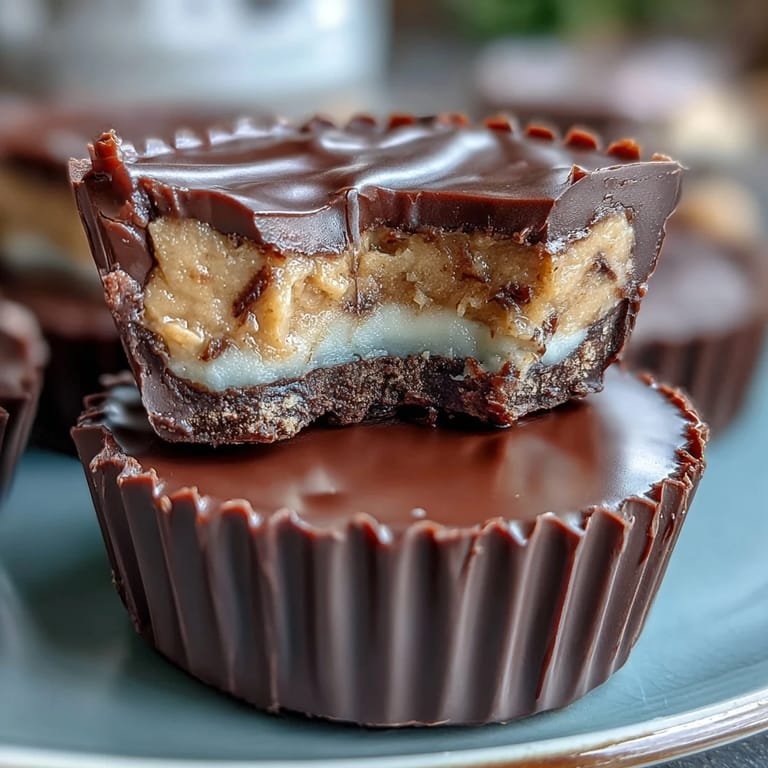
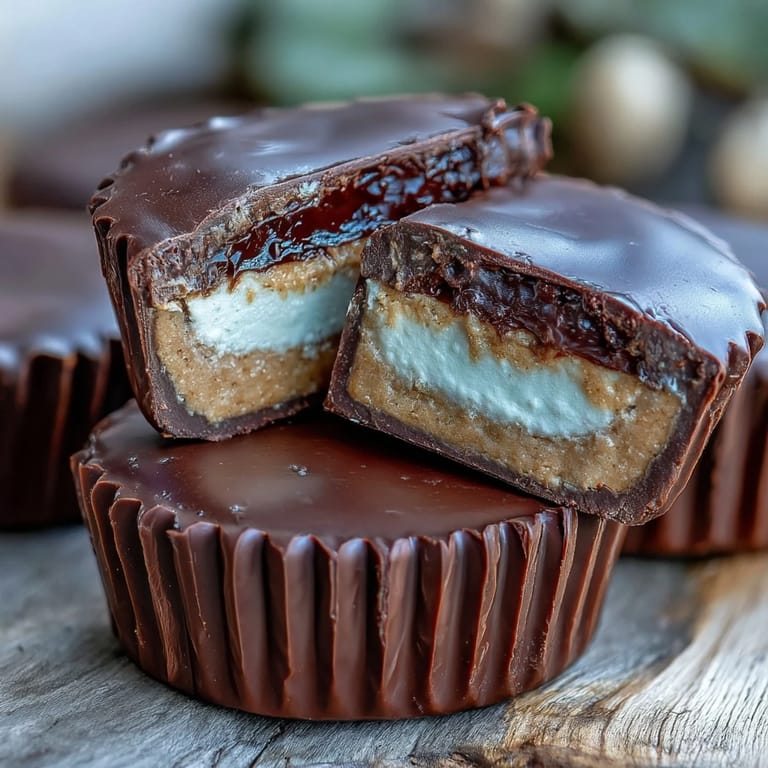
Save My gym buddy texted me one afternoon asking if I could make something that didn't taste like cardboard for once, and that's when these peanut butter cups came to life in my kitchen. I'd been experimenting with ways to satisfy my sweet tooth without derailing my fitness goals, and the moment I combined creamy Greek yogurt with dark chocolate, something just clicked. These aren't your typical gas station candy—they're tangy, protein-packed, and honestly more satisfying than anything I could buy. The first batch disappeared before my roommate even knew what hit the kitchen counter.
I made a triple batch for a Sunday meal prep session with my sister, and watching her face light up when she bit into one was worth all the careful layering. She kept asking if I was sure there wasn't some hidden sweetener or artificial ingredient, because they tasted too good to be healthy. That's when I realized these cups could actually bridge the gap between people who are strict about nutrition and those who just want something delicious. Now she requests them every time she visits.
Ingredients
- Dark Chocolate (200 g, 70% cocoa or higher), chopped: The higher cocoa percentage keeps things from getting cloyingly sweet and adds a sophisticated depth that balances the creamy layers underneath.
- Coconut Oil (1 tbsp): This thins out the chocolate just enough to coat evenly without seizing, and it adds a subtle tropical note that complements the peanut butter.
- Natural Peanut Butter (120 g or ½ cup): Look for the kind where oil sits on top—it means no weird additives are hiding in there, and the flavor tastes like actual peanuts.
- Honey or Maple Syrup (1 tbsp for peanut butter layer): Both work beautifully, though I've found maple syrup adds a deeper, earthier sweetness that feels more sophisticated.
- Vanilla or Unflavored Whey Protein Powder (1 scoop, about 30 g): This is your secret weapon for texture and protein content; don't skip it or the peanut butter layer won't bind properly when frozen.
- Thick Greek Yogurt (180 g or ¾ cup, full-fat or 2%): Full-fat yogurt gives you that luxurious creaminess and tanginess that makes these cups different from standard candy.
- Honey or Maple Syrup (1 tbsp for yogurt filling): This sweetens the yogurt layer gently without overwhelming its natural tang.
- Vanilla Extract (1 tsp): A small amount rounds out the flavors and keeps everything from tasting too sharp.
- Salt (pinch): Never underestimate how a tiny bit of salt can make chocolate and peanut butter sing together.
Tired of Takeout? 🥡
Get 10 meals you can make faster than delivery arrives. Seriously.
One email. No spam. Unsubscribe anytime.
Instructions
- Set up your chocolate vessels:
- Line your mini muffin tin with paper liners—this step saves you from the frustration of trying to peel frozen chocolate later. Think of these liners as little edible vessels that make everything easier.
- Melt the chocolate gently:
- Use 30-second microwave intervals and stir between each one, watching the chocolate start to shine as it comes together. This slow approach prevents that grainy, seized chocolate that tastes like disappointment.
- Create the chocolate foundation:
- Drop about a teaspoon of melted chocolate into each liner and use the back of your spoon to push it slightly up the sides, creating a thin shell. You're building a edible cup, so make sure the bottom and sides are evenly coated, then pop the tin in the freezer for 10 minutes.
- Mix the peanut butter layer:
- Combine your peanut butter, protein powder, and honey in a small bowl, stirring until everything comes together smoothly. If it feels a bit stiff, you're on the right track—this thickness helps it stay in place during the next steps.
- Blend the yogurt filling:
- In another bowl, whisk together your Greek yogurt, honey, vanilla extract, and a pinch of salt until creamy and spreadable. The salt here is crucial because it brightens the tang of the yogurt and makes it taste less like healthy food and more like real dessert.
- Layer the peanut butter:
- Take your tin out of the freezer and place about a teaspoon of the peanut butter mixture on each chocolate base. Use your spoon to flatten it gently so it creates an even layer that won't shift when you add the next component.
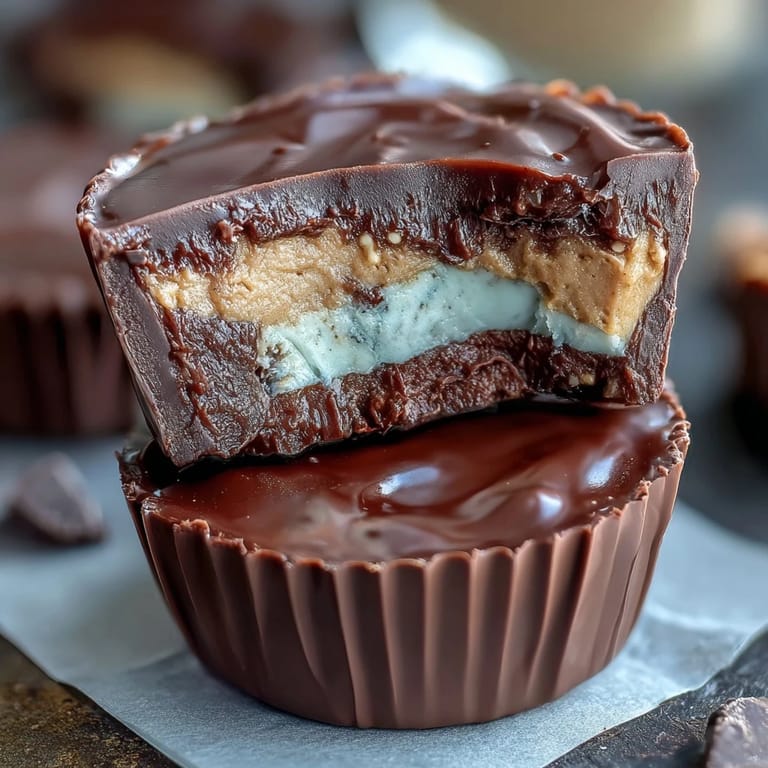
- Add the yogurt center:
- Spoon about a teaspoon of the yogurt mixture over each peanut butter layer and flatten gently. This creamy, tangy center is what makes these cups unique, so take your time and make sure each one gets its fair share.
- Seal with the chocolate top:
- Cover each cup completely with the remaining melted chocolate, using your spoon to make sure the edges are sealed so nothing leaks out during freezing. Work relatively quickly here since the chocolate will start to set, but don't rush—a well-sealed cup stays fresh much longer.
- Freeze until firm:
- Pop the entire tin into the freezer for at least an hour, though I usually leave mine for closer to two hours. You'll know they're ready when they feel solid but not rock-hard, and the chocolate snaps cleanly when you bite into it.
- Store and enjoy:
- Once frozen solid, you can transfer them to an airtight container in the refrigerator. They keep for about a week, though mine never last that long.
 Save
Save There's something about making homemade candy that feels almost revolutionary after years of buying the mass-produced stuff. When I handed these to my friend who's always stress-eating vending machine snacks, knowing they had actual protein and real ingredients, it felt like I'd given her permission to enjoy something guilt-free. That moment mattered more than any perfect presentation could have.
Why These Beat Store-Bought Cups
The first time I compared my homemade cups to the commercial versions side by side, the difference was obvious—mine had visible, recognizable ingredients while theirs had ingredient lists that read like a chemistry experiment. You control the quality of everything here, from choosing 70% chocolate instead of whatever's cheapest to picking Greek yogurt that actually tastes tangy instead of artificially flavored. Plus, the cost per cup is usually half of what I'd spend buying them, and they taste infinitely better.
How to Customize Your Cups
Once you've made these once, you'll start getting creative ideas—that's when the real fun begins. I've experimented with different nut butters, added cocoa powder to the yogurt layer for extra chocolate flavor, and even sprinkled sea salt on top before the final freeze. The beauty of this recipe is that the structure stays the same while you play with flavors.
Storage and Make-Ahead Thoughts
These cups live happily in your refrigerator for about a week, making them perfect for meal prep or having something ready when cravings hit at three in the afternoon. I've also frozen them for up to two months, though I've never had them stick around that long because they're so convenient to grab. The best part is that you can make a double batch on Sunday and have protein-packed snacks ready for the entire week ahead.
- Store them in an airtight container so they don't pick up weird freezer flavors.
- If they get too hard and cold, let them sit at room temperature for two minutes before eating—they'll taste creamier.
- These are perfect grab-and-go snacks before workouts or afternoon slumps when you need real sustenance.
 Save
Save These cups proved that healthy eating doesn't have to taste like punishment, and that's a lesson I think everyone deserves to learn. Make a batch this week and taste the difference that real ingredients and a little kitchen creativity can make.
Recipe FAQs
- → What type of chocolate works best for these cups?
Use dark chocolate with at least 70% cocoa content for a rich flavor and firm texture. It melts smoothly and pairs well with peanut butter.
- → Can I substitute the peanut butter?
Yes, almond or sunflower seed butter can be used as alternatives for those with peanut allergies or different flavor preferences.
- → How should I store these peanut butter cups?
Keep them chilled in the refrigerator to maintain firmness and freshness, especially since they contain Greek yogurt.
- → Is it necessary to add protein powder?
No, protein powder is optional but enhances the protein content, making the snack more filling and nutrition-dense.
- → How long do they need to chill before eating?
Allow at least one hour in the freezer to fully set each layer and achieve the perfect texture.
- → Can natural sweeteners be adjusted?
Yes, honey or maple syrup amounts can be modified to taste, or replaced with stevia for a lower-sugar option.