 Save
Save My coworker brought these peanut butter cup cheesecake bars to a potluck last spring, and I watched them disappear faster than anything else on the table. She caught me eyeing the last piece and laughed, handing it over with a knowing smile because she'd made extra specifically hoping someone would ask for the recipe. That first bite hit different—creamy, nutty, chocolatey all at once without feeling heavy. I went home that night determined to figure out how to make them myself, and after some trial and error, I realized the secret wasn't in complexity but in respecting the balance between the rich filling and those little peanut butter cup chunks scattered throughout.
I made these for my daughter's book club gathering on a rainy afternoon, and something magical happened when people bit into them—everyone went quiet for a moment, which rarely happens at our house. My neighbor, who usually doesn't eat desserts, came back for a second bar and admitted she'd been stress-eating all week but these made her actually enjoy something sweet instead of just mechanically consuming it. Those little moments remind me that baking for others is really about creating a small pause in their day.
Ingredients
- Chocolate cookie crumbs (1 1/2 cups): Oreos work beautifully, and removing the cream filling lightens the base just enough so it doesn't overpower the cheesecake layer.
- Unsalted butter (1/4 cup, melted): This binds the crumbs together and creates that perfect press-into-the-pan texture without adding extra salt.
- Granulated sugar for crust (2 tbsp): A small amount adds sweetness without making the base taste like dessert twice over.
- Cream cheese (16 oz, softened): Room temperature is non-negotiable here—cold cream cheese refuses to blend smoothly and you'll end up with lumps.
- Granulated sugar for filling (2/3 cup): This sweetens the filling while the sour cream keeps it from becoming cloying.
- Large eggs (2, room temperature): Temperature matters because cold eggs don't incorporate as easily, which can introduce air bubbles that crack during baking.
- Sour cream (1/2 cup): This adds tang and prevents the cheesecake from being one-note sweet, plus it creates a denser, more luxurious crumb.
- Creamy peanut butter (1/2 cup): Natural peanut butter works too, but you might need to stir it first to combine the oil, and the texture will be slightly grainier.
- Vanilla extract (1 tsp): A quiet ingredient that pulls all the flavors together without announcing itself.
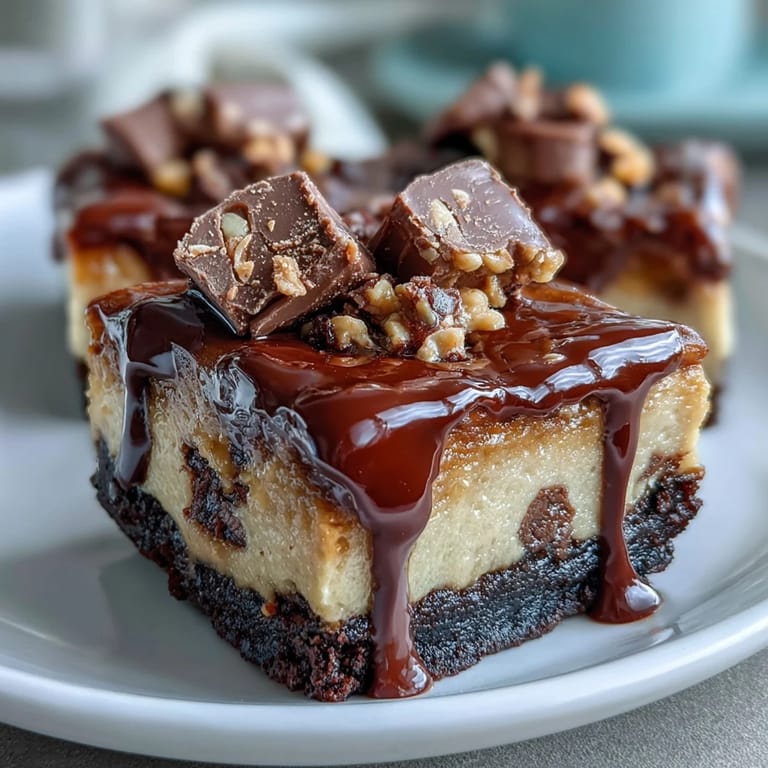
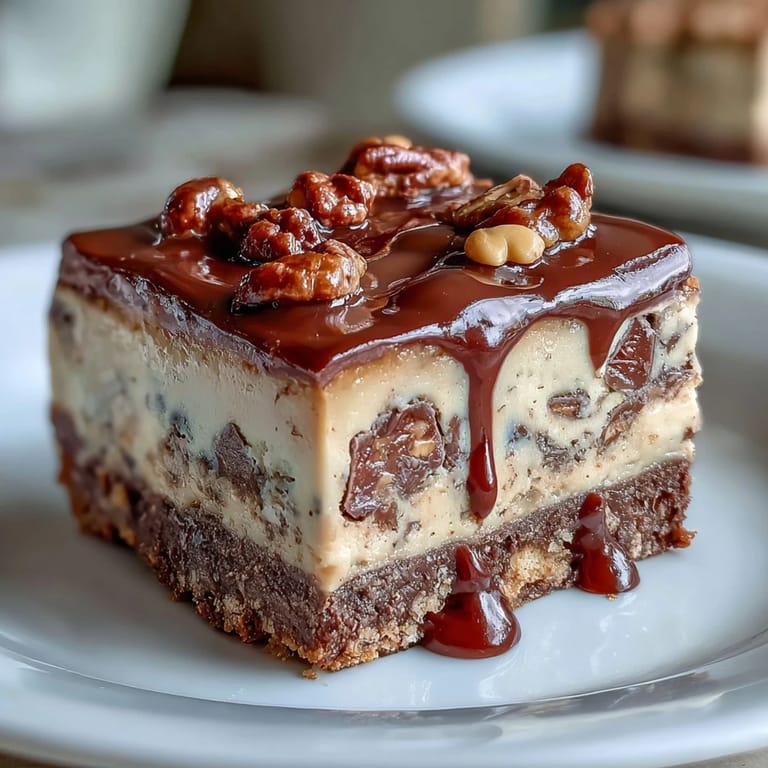
- Mini peanut butter cups (1 1/2 cups, chopped): Chopping them instead of leaving them whole prevents them from sinking to the bottom during baking.
- Semisweet chocolate chips (1/2 cup, optional): A final garnish that adds visual appeal and another layer of chocolate flavor.
- Creamy peanut butter for drizzling (2 tbsp, melted): A finishing touch that reminds people this is unapologetically a peanut butter dessert.
Tired of Takeout? 🥡
Get 10 meals you can make faster than delivery arrives. Seriously.
One email. No spam. Unsubscribe anytime.
Instructions
- Get your oven ready and prep the pan:
- Preheat to 350°F and line your 9x9-inch pan with parchment paper, leaving overhang on two sides so you can lift the entire baked rectangle out later. This small step saves you from having to carefully cut around the edges.
- Build the chocolate cookie foundation:
- Mix crushed cookies, melted butter, and sugar until it looks like damp sand, then press it firmly into the bottom of the pan—use the bottom of a measuring cup to get it really compact. Bake for 8 minutes so the crust sets enough to hold the filling without becoming hard.
- Combine the cream cheese base:
- Beat softened cream cheese and sugar together until completely smooth, scraping down the bowl halfway through because lumps in the cheese now mean lumps in the final bars. This usually takes about 2 minutes with an electric mixer.
- Add eggs with intention:
- Drop in one egg at a time, beating just until it disappears before adding the next one—overmixing at this stage whips in air that can cause the top to crack. Once both eggs are incorporated, mix in sour cream, peanut butter, and vanilla until you have a silky, uniform filling.
- Fold in the chocolate-peanut butter pieces:
- Gently fold 1 cup of chopped peanut butter cups into the filling with a spatula, being careful not to overwork the batter. This distributes them evenly so you get peanut butter cup in almost every bite.
- Assemble and layer:
- Pour the filling over the cooled crust and spread it into an even layer, then sprinkle the remaining 1/2 cup chopped peanut butter cups on top. This two-layer approach means some cups stay on the surface where they caramelize slightly.
- Bake with patience:
- Bake for 25-28 minutes until the edges look set but the very center still has a slight jiggle when you gently shake the pan—this means it will finish cooking as it cools and you won't end up with a dry, overbaked bar. You'll know it's ready when the kitchen smells like a candy shop collided with a bakery.
- Cool in stages:
- Let the bars come to room temperature on the counter first, which prevents thermal shock, then refrigerate for at least 2 hours until they're firm enough to cut cleanly. Rushing this step results in sloppy, hard-to-portion bars.
- Finish and serve:
- Before serving, drizzle with melted peanut butter in thin lines and scatter chocolate chips across the top if you're feeling generous. Slice with a sharp knife that you run under warm water between cuts for clean edges.
 Save
Save One afternoon, my teenage son came home from school and immediately smelled these bars cooling on the counter, and instead of disappearing to his room like usual, he sat at the kitchen island asking questions about why we temper chocolate or fold ingredients gently. That small conversation about the why behind recipe steps mattered more than the bars themselves, though watching him bite into one and grin said everything I needed to know.
The Truth About Cheesecake Cracks
Cheesecake has a reputation for cracking, and while these bars are more forgiving than a full-size cake because they're baked in a thinner layer, a few things help prevent it entirely. Using room-temperature ingredients, not overbaking past the slight jiggle stage, and letting them cool gradually rather than shocking them with cold air all contribute to a smooth, gorgeous top. The peanut butter cups on top actually hide any imperfections anyway, so there's grace built into this recipe.
Storing and Serving These Bars
These bars taste best when they've been refrigerated and are served straight from the cold, which brings out the richness of the chocolate and peanut butter without them feeling heavy. I've found that cutting them into 16 bars takes about two minutes with a sharp knife and a warm water rinse between cuts, which makes plating them for company look effortless. They keep in an airtight container in the refrigerator for five days, though they rarely last that long in my kitchen because people keep finding excuses to grab just one more.
Elevating Your Dessert Game
Making cheesecake bars taught me that desserts don't need to be intimidating or require restaurant-level skill to impress people. What matters is using quality ingredients, respecting the technique, and understanding that a little extra time in the refrigerator creates texture and flavor that justifies the wait. These bars sit at the intersection of simple and special, which is honestly where the best recipes live.
- For a crunchier base, stir in 1/4 cup finely chopped roasted peanuts to the cookie crumb mixture before pressing into the pan.
- Almond butter can substitute for peanut butter if you prefer a subtly different flavor, though always check for cross-contamination with peanut allergies.
- Pair these with cold milk for dessert or black coffee the next morning when you're sneaking a slice before anyone else wakes up.
 Save
Save These bars are the kind of dessert that makes people ask for your recipe, and now you have one that feels like sharing a secret. Bake them when you need a little joy in your kitchen or when you want to remind the people you love that you're thinking of them.
Recipe FAQs
- → What type of crust is used for these bars?
A chocolate cookie crumb crust made from crushed Oreos with the cream removed, combined with melted butter and sugar, baked until firm.
- → Can I substitute peanut butter with another nut butter?
Yes, almond butter can be used as a substitute, but be sure to check for allergies.
- → How long should the bars be chilled before serving?
Chill the bars for at least 2 hours to ensure they are firm and sliceable.
- → Are the chocolate peanut butter cups essential?
They add rich texture and flavor but can be omitted or replaced according to preference.
- → What is the best way to store these bars?
Store them in an airtight container in the refrigerator for up to 5 days to maintain freshness.
- → Can I add extra crunch to the crust?
Yes, finely chopped roasted peanuts can be mixed into the crust for added texture.