 Save
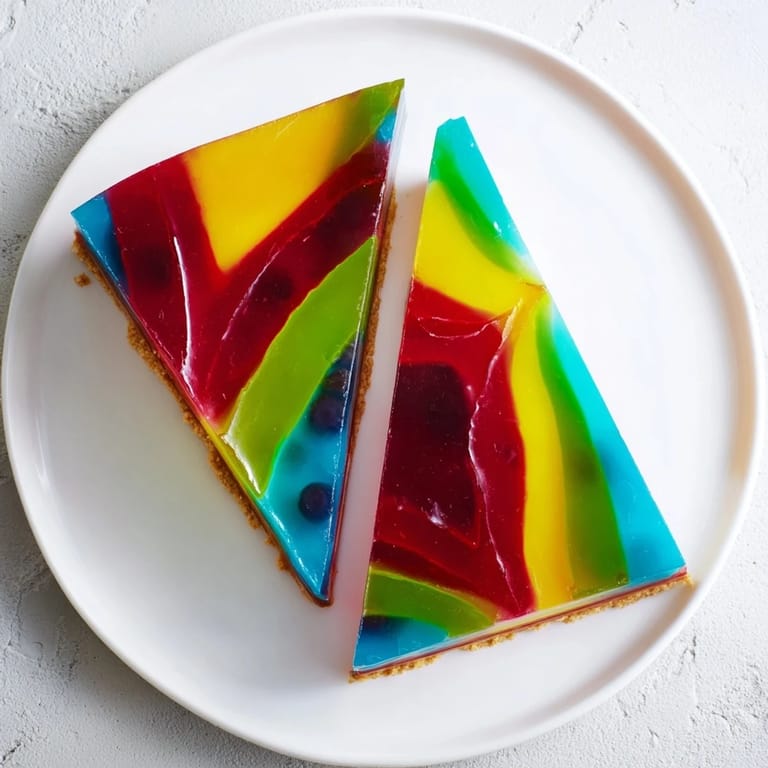
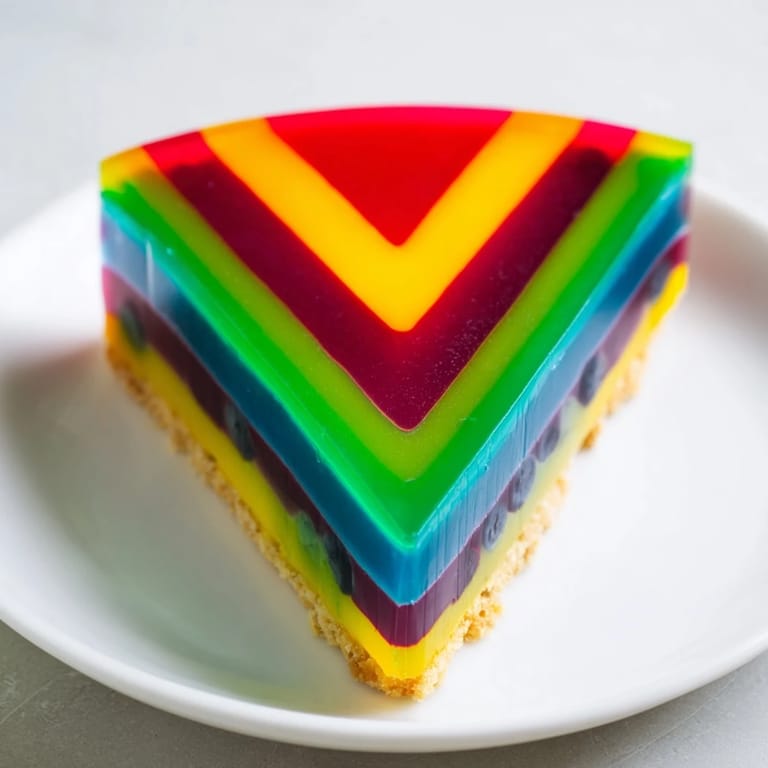
Save I stumbled onto the idea for this dessert while staring at a jar of homemade fruit purees lined up on my kitchen counter, each one catching the afternoon light in a different way. The colors were so vivid and distinct that I found myself wondering what would happen if I could trap them all in one slice, like those old kaleidoscope toys that shifted with every turn. That night, I started sketching divider patterns on napkins, experimenting with angles until the V-shape just felt right. The Kaleidoscope was born from pure visual curiosity, and it's become the dessert I reach for whenever I want people to gasp before they even taste it.
I made this for my sister's thirtieth birthday, and watching her cut into it was worth every minute of setup. She literally froze, fork in the air, just staring at the cross-section before anyone else at the table could even see what she was looking at. That's the magic of this dessert—it's not just something you eat, it's something that stops the conversation for a moment.
Ingredients
- Whole milk: The gentle foundation that lets every flavor shine without overpowering them.
- Heavy cream: Adds richness and silkiness; don't skip or substitute with lighter versions.
- Granulated sugar: Sweetness that balances the tartness of fruit purees perfectly.
- Powdered gelatin: The binding agent that sets everything into those clean, elegant layers; bloom it properly or you'll end up with lumps.
- Vanilla extract: A whisper of warmth that ties all the fruit flavors together.
- Food coloring: Use gel or liquid to match each fruit puree; a little goes a long way and won't water down your mixture.
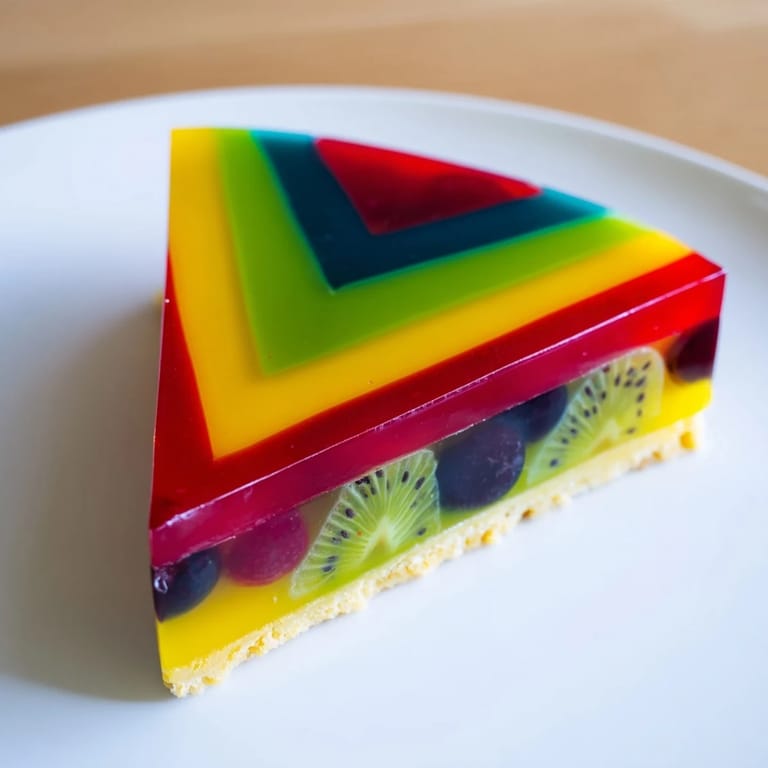
- Fruit purees: Raspberry, mango, kiwi, blueberry, and blackberry—pick ones that excite you color-wise, and make them fresh or use good quality frozen versions.
- Digestive biscuits or graham crackers: The sturdy base that anchors everything; crush them fine and pack them down firmly.
- Unsalted butter: Melted and mixed into crumbs, it creates a crust that holds up to the chilled filling.
Tired of Takeout? 🥡
Get 10 meals you can make faster than delivery arrives. Seriously.
One email. No spam. Unsubscribe anytime.
Instructions
- Build Your Foundation:
- Crush biscuits into fine, even crumbs with a food processor or by wrapping them in a towel and going to town with a rolling pin. Mix with melted butter until everything looks like damp sand, then press it firmly into the bottom of your springform pan, using the bottom of a measuring cup to get it level and compact.
- Wake Up the Gelatin:
- Sprinkle gelatin over cold water in a small bowl and let it sit undisturbed for about five minutes—it'll look like wet sand at first, then gradually plump up. If you're using sheets instead, soak them in cold water for the same amount of time and gently squeeze out the excess before using.
- Create the Custard Base:
- Pour milk, cream, and sugar into a saucepan and heat over medium, stirring occasionally until the sugar dissolves and the mixture steams gently. Once it's hot but not boiling, remove it from heat and stir in your bloomed gelatin until every granule disappears, then add vanilla and mix well.
- Add Color and Flavor:
- Divide the warm custard into five equal bowls and stir a different fruit puree and matching food coloring into each one. The colors will deepen as they set, so don't go too dark at this stage.
- Engineer the V-Shaped Sections:
- Line your springform pan with strips of aluminum foil or cardboard cut into V-shapes, creating five pie-slice-like sections radiating from the center. Pour each colored custard into its own section and chill for thirty minutes until the surfaces feel set but not fully firm to the touch.
- Reveal the Magic:
- Carefully lift away the dividers—this is the moment where you hold your breath—then gently run a warm knife around the pan's edge and release the springform. The kaleidoscope pattern will be waiting for you underneath.
- Final Chill:
- Return the whole dessert to the fridge for at least two more hours so the layers fully set and the flavors meld together beautifully.
 Save
Save The first time I served this, my friend asked if it was too beautiful to eat, and I laughed because I've never believed in that excuse. But watching someone cut into something you made with such care, seeing their face when they realize it tastes as good as it looks, that's when food becomes memory instead of just sustenance.
Playing with Color and Flavor Combinations
The beauty of this dessert is that it's not tied to any specific flavors—you're really just building a framework for your own creativity. I've made versions with passion fruit and coconut, with strawberry and dark chocolate notes, even with lavender and lemon for a more delicate approach. The key is choosing purees that aren't too watery, since you want enough body for clean layers. Trust your instincts about which fruits naturally complement each other, and don't be afraid to make one section a wild card if you're feeling adventurous.
The Divider Technique That Actually Works
Getting those V-shaped dividers right is genuinely the trickiest part, and it took me three attempts to figure out the trick. Aluminum foil works better than cardboard because it holds its shape without bending, and if you score it lightly before creating your V's, it becomes much more cooperative. Another approach that's become my favorite is using strips of parchment paper taped to the sides of the pan with waterproof tape, creating dividers that slide out almost effortlessly after the first thirty-minute chill. The patience of setting up your scaffolding properly at the beginning pays off tenfold when your pattern emerges flawlessly.
- Create a template on paper first, then transfer it to your divider material for precision.
- Make sure each section is roughly equal in angle, or some pieces will be awkwardly shaped.
- Test-fit everything before pouring any custard to catch problems early.
Serving and Presentation
Slice this dessert with a hot, wet knife wiped clean between each cut—it's a small ritual that yields dramatically better results. I like to plate it on something simple and let the colors do all the talking, though a quenelle of whipped cream or a few fresh berries on the side add elegance without competing for attention. The best part is that you can make this the day before, wrap it loosely, and slice it fresh just before guests arrive, giving you one less thing to stress about when people are already at your table.
- A hot knife dipped in hot water and wiped dry before each cut prevents smudging and keeps edges clean.
- Serve it slightly chilled but not ice-cold so the gelatin sets the flavors without numbing them.
- Leftover slices keep well covered in the fridge for up to three days.
 Save
Save This dessert has become my answer to "what should I bring" questions because it delivers both visual impact and genuine deliciousness. Once you've made it once and seen the look on someone's face, you'll understand why it's worth the effort.
Recipe FAQs
- → How do I achieve distinct V-shaped layers?
Use aluminum foil or cardboard dividers to partition the pan into sections before pouring each colored mixture. Chill partially before removing dividers.
- → Can I substitute gelatin for a vegan alternative?
Yes, agar-agar can replace gelatin. Use coconut milk and cream to maintain richness and follow agar-agar instructions for setting.
- → What types of fruit purees work best for vibrant colors?
Raspberry, mango, kiwi, blueberry, and blackberry purees provide bright, natural hues and distinct flavors that complement each layer well.
- → How can I make the base crunchy and flavorful?
Crush digestive biscuits or graham crackers finely and mix well with melted unsalted butter before pressing firmly into the pan.
- → How long does it take for the layers to set properly?
Allow about 30 minutes for partial setting between layers and chill the entire dessert for at least 2 hours to achieve firm texture.