 Save
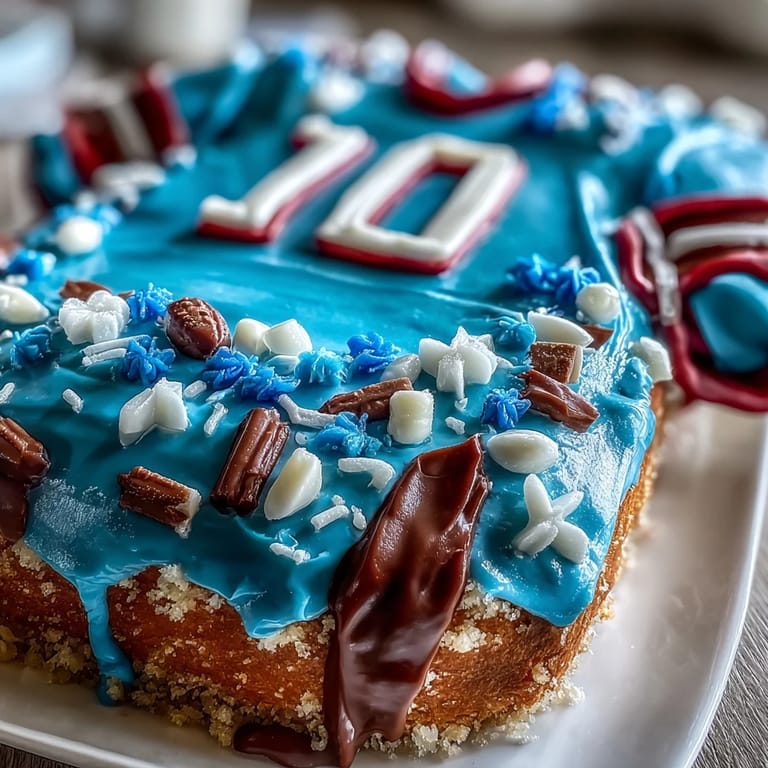
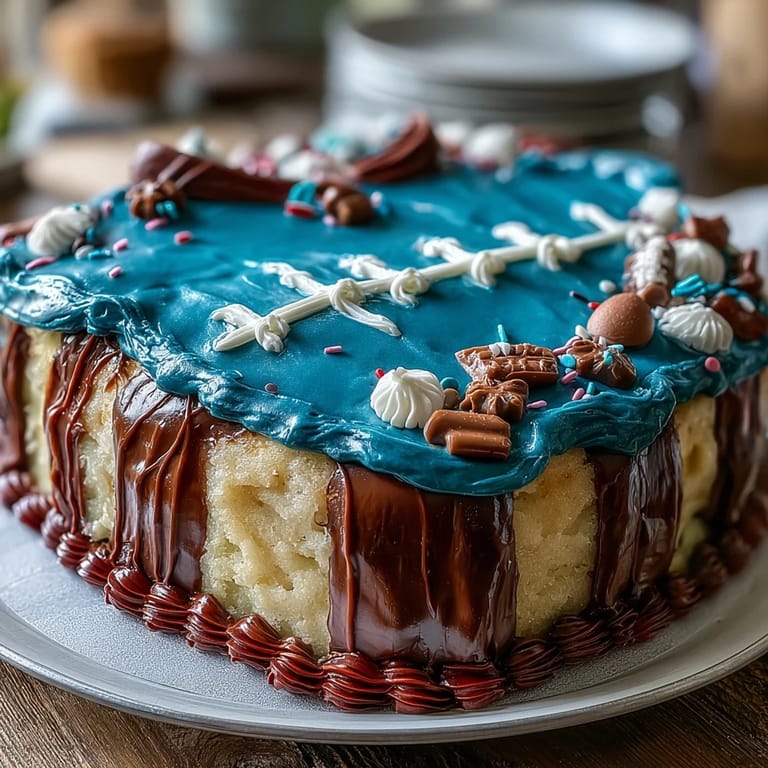
Save The first time I attempted a sports jersey cake, I underestimated how thrilling it would be to see the team's colors come alive in the kitchen. The entire house smelled of sweet vanilla and butter as I wrestled with fondant on a humid afternoon, and the radio was playing in the background. There was something satisfying about transforming a regular cake into a personalized centerpiece, especially for a graduation that celebrated both accomplishment and love of the game. My hands were sticky, my workspace was a delightful mess, and, honestly, lining the cake pan felt more nerve-wracking than carving out the jersey shape. By the end, I realized that this cake was as much about bold creativity as it was about baking.
Making this for my cousin's graduation was like prepping for game day with the family cheering on from the living room. There was teasing about whether I'd get the soccer stripes straight and my aunt kept dipping a finger into the buttercream bowl when she thought I wasn't looking. As the kitchen filled with laughter and nervous excitement, it struck me how food can turn a simple celebration into a lasting memory. Getting the numbers just right became a group effort, and the moment the cake landed on the table, my cousin’s grin was worth every bit of effort. Nothing brought everyone together more than decorating that last stripe.
Ingredients
- All-purpose flour: Sift it for a lighter crumb and weigh it for flawless results—accuracy matters for carving.
- Baking powder: Even rise is essential so the cake shape looks sharp after carving.
- Salt: Balances sweetness and subtly boosts the vanilla.
- Unsalted butter: Soft, room temperature butter whips smoothly for both cake and frosting.
- Granulated sugar: Beating it with butter creates that classic fluffy, moist base.
- Eggs: Add one at a time for even texture—splitting the shells is oddly calming.
- Whole milk: Gives richness and helps batter stay silky so it's easier to sculpt.
- Vanilla extract: Adds warmth and depth; real vanilla makes all the difference.
- Powdered sugar: Make sure it’s lump-free or sifted for the smoothest buttercream.
- White fondant: Handles best with gloves and a dusting of cornstarch to avoid sticking.
- Food coloring gel: Gel achieves vivid colors without thinning the fondant; start with tiny drops.
- Edible black food marker or black fondant: These create sharp outlines and crisp jersey details.
- Cornstarch: Stops fondant from grabbing onto your rolling pin or board.
Tired of Takeout? 🥡
Get 10 meals you can make faster than delivery arrives. Seriously.
One email. No spam. Unsubscribe anytime.
Instructions
- Get Your Kitchen Ready:
- Preheat the oven to 350 °F (175 °C) and line your cake pan with parchment, smoothing the edges to banish sticky surprises.
- Combine Dry Ingredients:
- Whisk flour, baking powder, and salt together until you can smell their nutty aroma—the foundation is set.
- Cream Butter & Sugar:
- Let the mixer run free until the mixture turns pale and airy, feeling almost cloud-like; add eggs one at a time and listen for that satisfying plop.
- Create Cake Batter:
- Add vanilla, then alternately pour in the flour mixture and milk, gently folding until everything looks silky and thick.
- Bake & Cool:
- Spoon the batter into your pan and smooth it for an even surface; bake until golden and a toothpick comes out clean, then cool completely.
- Make Buttercream:
- Beat softened butter with sugar, salt, and vanilla until fluffy, then add milk for spreadable, glossy frosting.
- Shape the Jersey:
- Once cooled, lift the cake from the pan and use a serrated knife to sculpt the shoulders and sides, keeping curves bold and playful.
- Apply the Crumb Coat:
- Spread a thin layer of buttercream all over, making sure every crumb is covered, then chill so the surface firms up.
- Dye & Roll Fondant:
- Color fondant with gels and knead until even, then roll it thin over cornstarch so it drapes smoothly and doesn't stick.
- Cover & Trim:
- Lay fondant over chilled cake, smoothing it down with your palms and cutting away extra for a neat edge.
- Add Jersey Details:
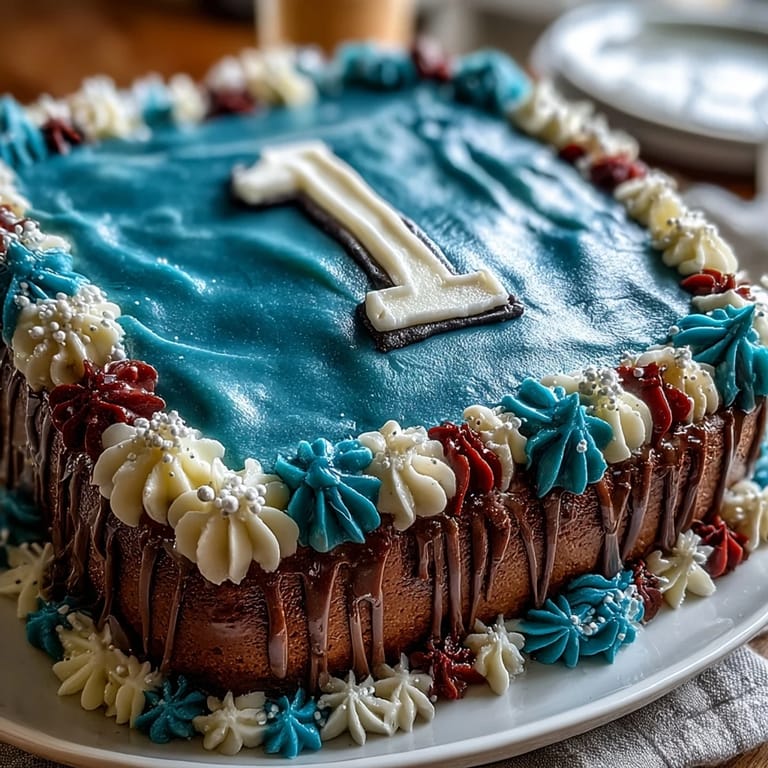
- Decorate with colored fondant or food markers for the collar, numbers, name, and graduation year—personal touches make this truly special.
- Serve & Celebrate:
- Lift the cake onto a board and present it proudly; the applause feels even sweeter than the first slice.
 Save
Save During my brother's graduation, this jersey cake became the talk of the party, way before dinner. Even the youngest cousins huddled around, guessing what sport I'd pick for the design and offering their names for the back of the cake. At that moment, we weren’t just celebrating a milestone; we shared the excitement that sports brings. The tradition stuck—now every graduation means someone gets a custom edible jersey. I never imagined a dessert could spark so much laughter and connection.
Choosing Colors Like a Pro
Mixing food coloring into fondant can be messy, but the tiny gel tubes help create brilliant team colors without soaking your hands. Use gloves and add color slowly, kneading evenly so the hue is consistent and there are no streaks. If you need a new shade, mix primary colors together before working them into the fondant. Remember: vibrant colors always get more cheers around the table. Extra fondant can be saved for spontaneous stripes and numbers.
Mastering the Jersey Cut
The key to cutting out a jersey shape is starting with a rectangle and sketching gentle curves at the shoulders—use a printed template to guide your knife if you’re nervous. I discovered that drawing a rough outline in powdered sugar first makes trimming less intimidating and keeps things symmetrical. Use a serrated knife for cleaner edges, but don’t fret if you make a mistake—most slips get covered by fondant anyway. Carving out the armholes added just enough drama for the final reveal. If you carve with confidence, each jersey turns out uniquely you.
Personalizing for the Graduate
Adding the graduate’s name, number, and favorite sport transforms this into a keepsake—even decorating feels like a celebration. Edible markers make writing neat, but practice on parchment first! If you’re not sure about stripes, roll extra fondant to try different patterns before settling on your favorite. Don’t forget, even the smallest details make this cake memorable.
- Check the spelling before starting the lettering.
- Keep a small brush handy for smoothing fondant edges.
- Let your personality shine through with creative color choices.
 Save
Save Whether you’re baking for a team or one special graduate, this cake brings the celebration right to the table. Every slice feels like a victory lap, and you’ll be surprised by how many memories stick around long after the crumbs are gone.
Recipe FAQs
- → How do I shape the cake into a jersey?
After cooling, use a serrated knife to carve the cake into a rectangle with curved shoulders and armhole indentations.
- → What colors can I use for the fondant?
Use food coloring gel to tint fondant in any team or school colors, customizing for the graduate's favorites.
- → Can I make the cake chocolate?
Yes, replace ¾ cup of flour with unsweetened cocoa powder to create a chocolate-flavored version.
- → Is this cake suitable for vegetarians?
Yes, all ingredients listed are vegetarian, making it suitable for a wide range of guests.
- → How is the cake decorated?
The cake is covered in buttercream and fondant, then detailed with edible markers or colored fondant for numbers and stripes.
- → What tools do I need to make this cake?
You'll need a cake pan, mixer, bowls, serrated knife, rolling pin, spatula, parchment paper, and fondant smoother.
- → What allergens are present?
The cake contains wheat, eggs, and dairy. Fondant may have nut traces; check packaging for allergy concerns.